
102.1 - Create your first gSheet
The method for creating a spreadsheet on a PC or a Mac involves opening the spread sheet application first (typically Microsoft Excel) and then selecting "File > New" or something comparable. Ironically, to my knowledge that was the "last option" added by Google.
In the beginning, you would got to google drive ( drive.google.com) and you would select "New > Google Sheet" and it would then open the sheets application with a blank template. To my knowledge you couldn't even get into the application without either doing that or without clicking on an existing file.
Below is a very brief written outline of 3 methods for creating your first Google Sheet. Details for each method with photos follow these summaries...
Method 1 -- Google offers a similar system for creating a file as what you are used to. In the address bar of a browser type sheets.google.com and click on the white square with the big PLUS (+) sign to create a new, blank google sheet in the root folder of google drive.
Method 2 -- If you are using Google Chrome for your browser and the Apps icon is present just below the address bar, you can click on it and then select the Google Sheets Icon to get to the same interface as presented in Method 1. (so with this method, no need to remember/type sheets.google.com in the address bar).
Method 3 -- You can create a new file from the Google Drive interface ( drive.google.com ) by selecting New > Google Sheet. This was the original method for creating a sheet, and this is the method I'd encourage you to use after you are use to working with Drive as it enables you to specify the directory for the file as you are creating the file, where as Methods 1 and 2 create the file in the root directory of your Google Drive and then you have to remember to move it to another folder after the fact.
Creating a spreadsheet and knowing where you saved it might be one of the harder parts about using Google Sheets. Once you get that hang of that, the rest is easy...
Method 1 -- sheets.google.com
In any major web browser (Google Chrome recommended), type "sheets.google.com" into the address bar.
Log in with your google account if prompted...
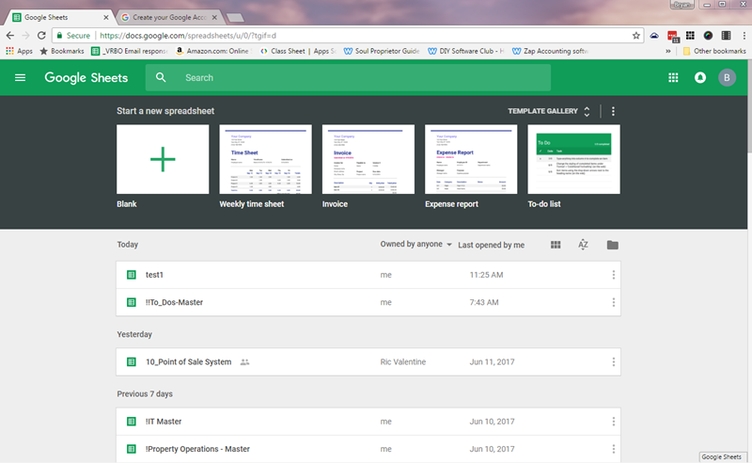
and you will land here....
Log in with your google account if prompted...
and you will land here....
The image below is the same as above, but numbered areas have been added for reference...

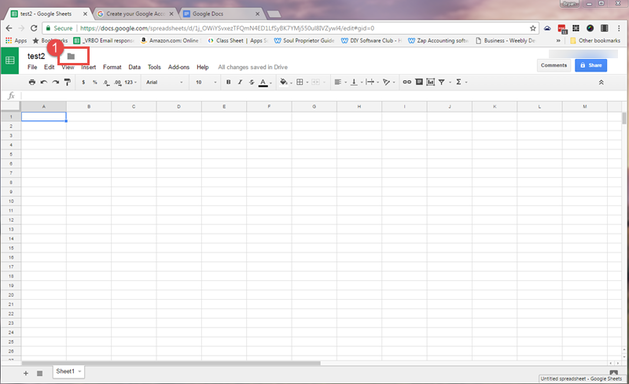
1) Address Bar -- You typed in "sheets.google.com" but you got redirected to "docs.google.com/spreadsheets".
docs.google.com represents Google's "digital documents" -- as in all types of digital documents, so the term Google Docs in fact has two meanings. First it means "all types of digital documents" as is used here in this URL, and second, it is a specific reference to their word processing program.
Another way to get to this page is to type in "docs.google.com" to get to Google's digital document interface, and then select the hamburger button (#2) and then Google Sheets.
The image below is the same as above, just repeated for easy reference...
2) Hamburger Button -- This icon is refereed to as a "hamburger" button/icon. This term is becoming a cloud computing industry norm. This particular hamburger button gives access to a menu that offers links to Google Docs, Google Sheets, Google Slides, Settings, Help and Feedback, and Google Drive.
3) Create a new spreadsheet -- Click this icon to create a new Google Sheet. The new sheet will be created in the root directory of your Google Drive. You can then move it later.
4) Template Gallery -- These templates are standard templates that come with Google Sheets. In general, you will not likely use any of these. They can be fun to look at, and they may be good for ideas, but generally speaking, creating your own will be the way to go. You can add templates of your own to the template gallery. That may become very valuable as you progress as a user, and this template management system is easy to use.
5) Folder Icon -- The files listed below the folder icon are recent files edited only. The folder icon will give you access to your google Drive folders, and from there you can access/open existing gsheets.
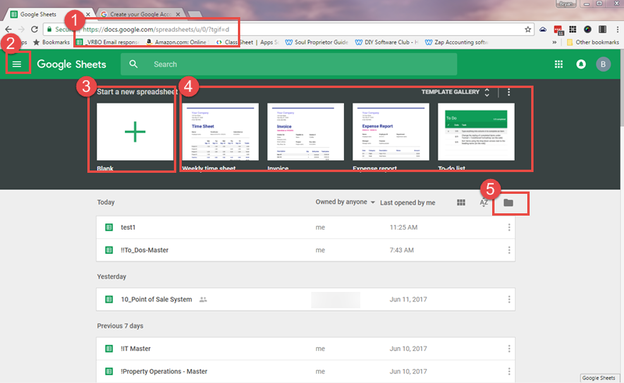
If you scroll down on the Google Sheets screen, the black section with the icon for "new spreadsheet" will disappear, but at the exact time they disappear, a red dot with a white plus in it will show up in the lower right corner of your screen.
If you click that red dot that is just like clicking the "new spreadsheet" icon (which was a white square with a green plus sign) .
This round icon with a plus in it in the lower right hand corner representing "new file" or new record or something appropriate for the page is starting to show up more across all google applications as well as in non google cloud applications like LastPass. (just an FYI)
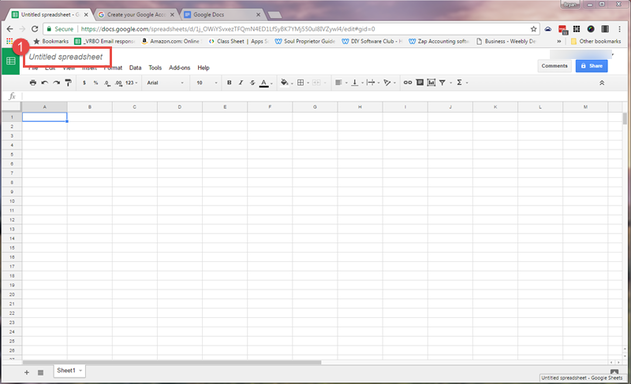
When you click on the white box with the green plus or the red circle with the white plus, you will be redirected to this screen, and you will have created your first Google Sheet.
Single click in box (1), and name the spreadsheet.
Single click in box (1), and name the spreadsheet.
As soon as you name the spreadsheet, a folder icon (1) will show up next to the file name.
Click on that icon and you can select a different folder for storage.
Click on that icon and you can select a different folder for storage.
Easy enough, right?
Yes, it really is quite easy. You only need to remember "sheets.google.com" or "docs.google.com" (and then use the hamburger button to change over to sheets) to get going on a new spreadsheet.
The thing I do NOT like about this system:
Yes, it really is quite easy. You only need to remember "sheets.google.com" or "docs.google.com" (and then use the hamburger button to change over to sheets) to get going on a new spreadsheet.
The thing I do NOT like about this system:
- If you forget to click on the folder icon at the end of the new file creation process, which most folks will forget to do, your new file will be in your root folder instead of in a folder where it should live long term. Obviously it's easy to find there, and google has an exceptional search functionality to find files, but in business, you will come to realize that you need a very solid digital filing system and this does not reinforce that in an ideal manner.
Method 2 -- Apps Icon
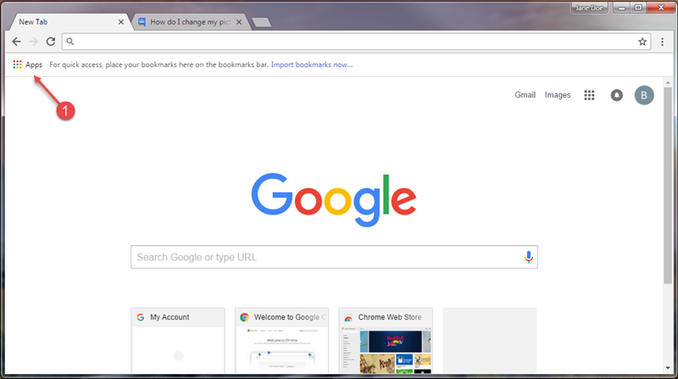
1) If you are in Google Chrome, instead of typing "sheets.google.com" or "docs.google.com" as in Method 1, you can just click on the Apps Icon (1) to get to the Apps Screen...
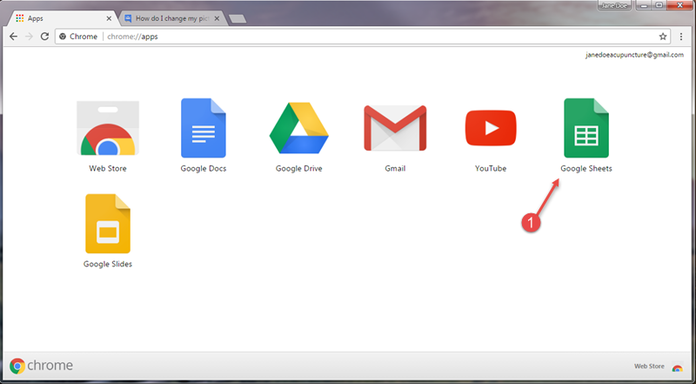
On the apps screen, click on Google Sheets (1)
NOTE: If you have a lot of apps loaded, there will be left/right scroll buttons at the bottom of this screen that enable you to scroll from one page to another much like a cell phone home screen scrolls left and right. If you don't see the GSheets icon when you get to this screen, see if you can scroll left or right to another screen.
NOTE: If you have a lot of apps loaded, there will be left/right scroll buttons at the bottom of this screen that enable you to scroll from one page to another much like a cell phone home screen scrolls left and right. If you don't see the GSheets icon when you get to this screen, see if you can scroll left or right to another screen.
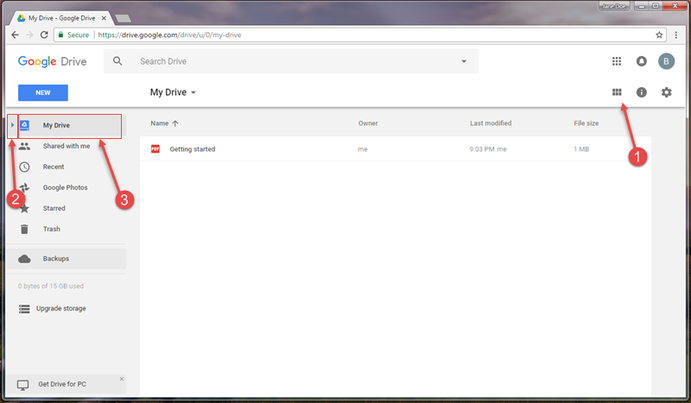
Method 3 -- drive.google.com
I prefer Method 3 over Method 1 and 2 because the user can decide what folder he wants the file created in BEFORE creating the file. To understand how this works, you need to first understand the folder tree and the left and right panes in Google Drive. If you don't understand this, you will create folders in unintended directories.
In the address bar of a browser (google chrome recommended) type in "drive.google.com"
==== OR ====
From the Apps Icon of Method 2, select Google Drive
Log in if necessary...
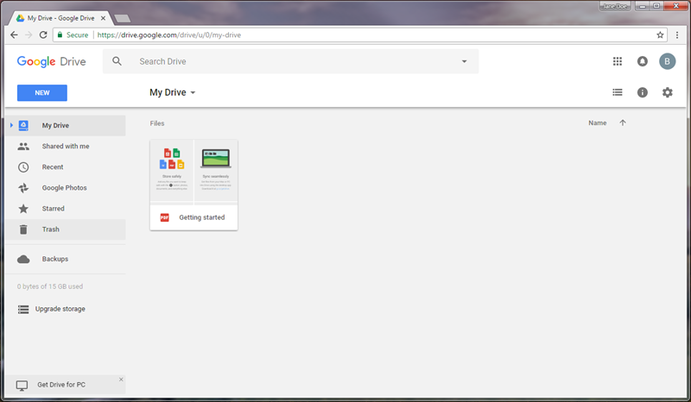
And you will land here.
NOTE: This is what Google Drive looks like for a brand new gmail account. It will have one file in the root directory and it will be showing file icons as opposed to list view...
==== OR ====
From the Apps Icon of Method 2, select Google Drive
Log in if necessary...
And you will land here.
NOTE: This is what Google Drive looks like for a brand new gmail account. It will have one file in the root directory and it will be showing file icons as opposed to list view...
I greatly prefer list view as compared to icon view. Click the list/thumbnail toggle icon for list view (1)
The small Triangle next to a folder (2) will expand and contract the folder tree in the LEFT PANE only. It will not show that folder's contents in the right pane. You'd have to click on the folder name (3) to get the contents of the folder to show up in the right pane.
Clicking a folder name (3) will show the folder contents in the RIGHT PANE only. It will not expand the folder tree related to that folder in the left pane.
Items 2 and 3 will NOT make any sense if you have no folders or Files in Drive, because nothing obvious will change about your left and right panes as you click (2) and (3). Create some folders and files to play with this.
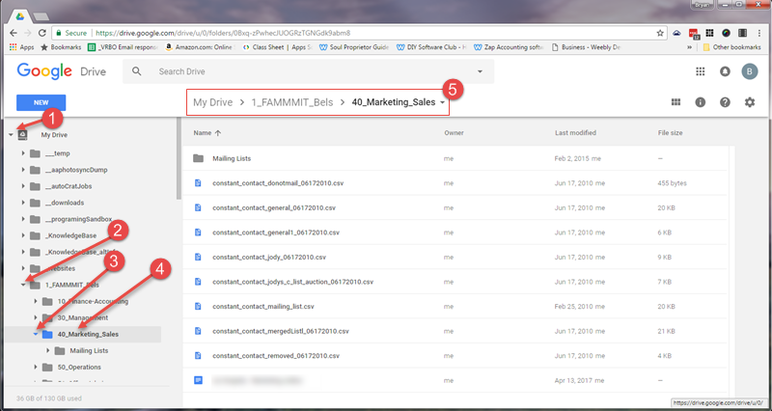
To make this example more relevant, I have switched to a Google Drive that has existing folders and files in it...
Remember, we are here to create a new Google Sheet in a folder of our choosing...
The first step is to navigate to he folder we want the file in in the LEFT PANE. The second step is to make sure the folder contents of that file are showing in the RIGHT PANE. The third step will be to use the NEW button to create the file.
So here we go....
1) Click on the triangle to expand the folders (1)
2) Click on the triangle to expand the folders (2)
3) Click on the triangle to expand the folders (3)
4) Click on the Folder name to "select" that folder and to show the folder contents in the right pane (4)
5) Verify the target folder name is in the directory string across the top...(5)
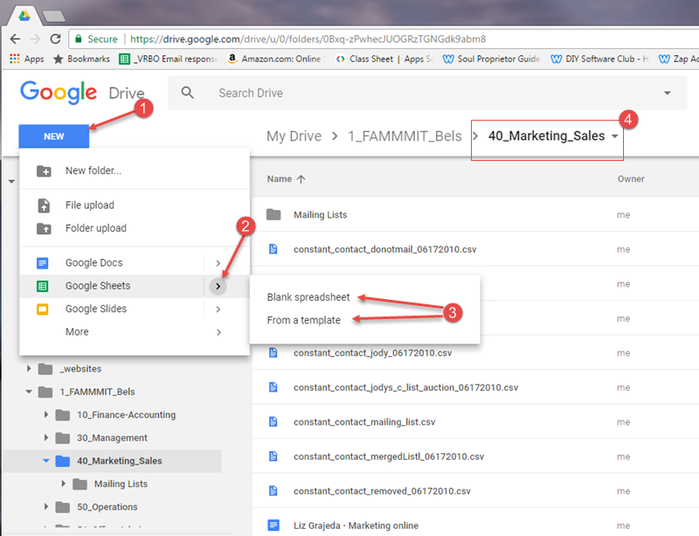
Now we are reading to create the new file....
1) Select "New" (1)
2) Hover over the ">" sign next to Google Sheets (2)
3) Select either "Blank Spreadsheet" or "From a Template" (3). For this example, select "Blank Spreadsheet". Note: "from a template" takes you to the same Application Landing page shown above prior.
4) This will create an unnamed spreadsheet in the folder you have active in the right pane (see image below)
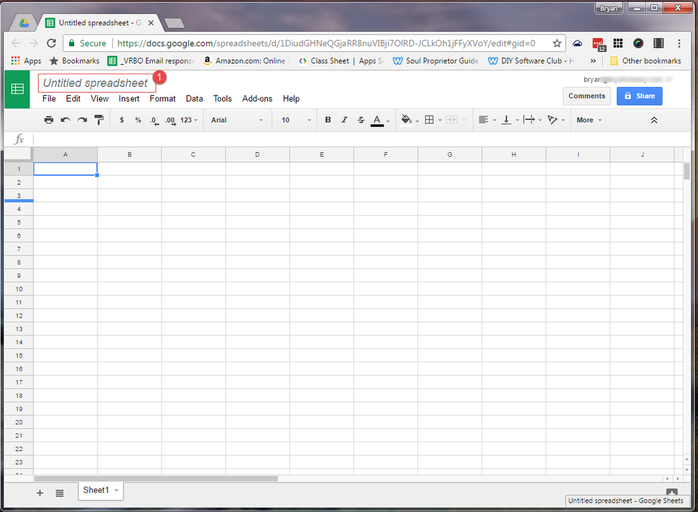
1) You can now click in the box (1) and name your spreadsheet.
NOTE: If you do NOT name your spreadsheet and you close the tab immediately, no spreadsheet will have been created.
NOTE: If you do NOT name your spreadsheet and you close the tab immediately, no spreadsheet will have been created.
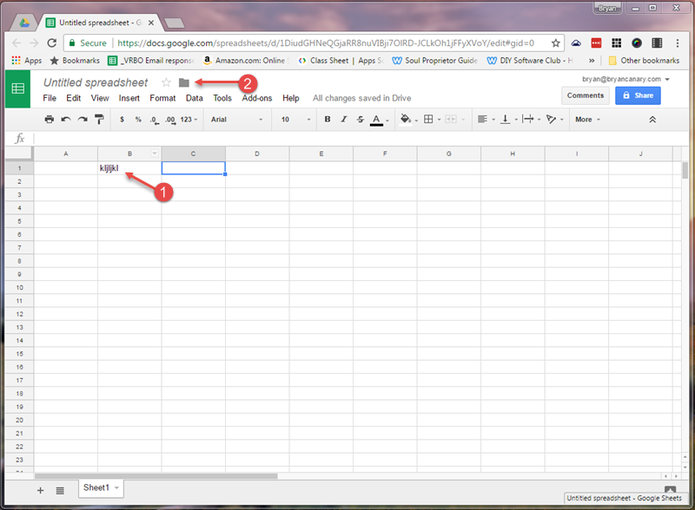
1) As soon as you type something in a cell and exit that cell, Google Sheets will auto-save the file with whatever name is in the file name box. You will know it saved because the folder icon will magically appear (2).
If you don't create a name first, it will create a file called "untitled spreadsheet".
To close the file/exit the application, you just click on the X in the browser tab.
There is no "save" as this auto saves every few keystrokes.
If you don't create a name first, it will create a file called "untitled spreadsheet".
To close the file/exit the application, you just click on the X in the browser tab.
There is no "save" as this auto saves every few keystrokes.
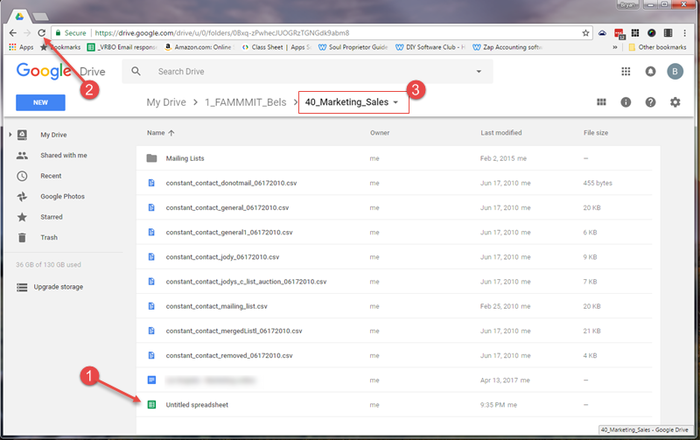
1) If you closed the tab after having entered data but without naming it, it will show up with the title of "Untitled spreadsheet" (1)
2) If you don't see the file in the directory right away, click on the refresh icon (2) and the file will then show up. NOTE: On refresh, Google Drive does NOT expand all your folders again... (as is shown in this screen shot -- see how the folder list is no longer expanded?)
3) Although the folder list is not expanded after a refresh, you can verify the folder you are in via the directory string across the top (3)
Summary
This isn't rocket science. It is however a fairly new and different process for creating a new document as compared to what you are used to, and there are a lot of icons and a few things that are not totally intuitive. Just practice this a few times until you become comfortable with it. The benefits of cloud based networked spreadsheets are going to blow your socks off... you just need to get the ABC's right before jumping in further.